Tuesday, April 17, 2018

LINUX : turn OFF password expiration / aging

Hi Team


If you are using linux as OS and want to set password as never expiry for any specific user, please follow the steps mentioned below:

Command:  sudo chage -l user_id


Note: The above screen shows that password for jbossapp is going to expire on May 9 2018.

Lets set password for jbossapp as never expiry.

Command: sudo chage jbossapp


Follow the above screenshot and pass same inputs.

Current status jbossapp user id:


Now password will never expire.

Sunday, April 8, 2018

Installing Java steps for WebSphere and Jboss


Installing Java on Ubuntu.

Having Java installed is a prerequisite for WebSphere and Jboss Application Server.  Installing Java with apt-get is easy. 

First, update the package index:

sudo apt-get update

Then, check if Java is not already installed:

java -version


( The above screen shot shows that Java is not installed ).

Installing the Oracle JDK


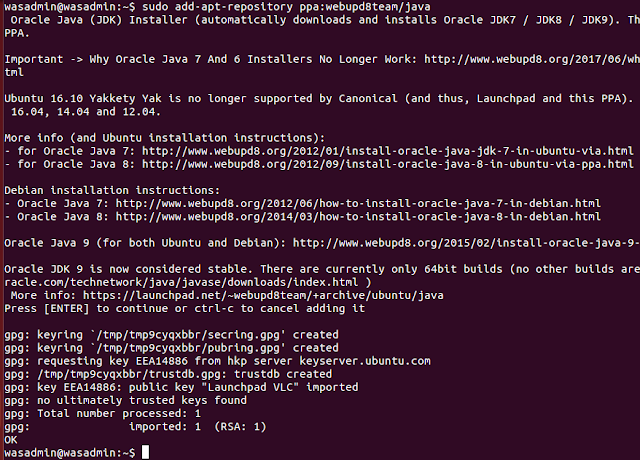
First, add Oracle's PPA, then update your package repository


Step 1 :  sudo add-apt-repository ppa:webupd8team/java


Then, depending on the version you want to install, execute one of the following commands:
This is the latest stable version of Java at time of writing, and the recommended version to install. You can do so using the following command:


Step 3 : sudo apt-get install oracle-java8-installer


JDK is installed now. Lets check :


Saturday, April 7, 2018

SSL CONFIGURATION | WEBSPHERE 8.5 | STEP BY STEP


Step By Step - SSL Configuration in WebSphere Application Server 8.5


Part 1: Creating a self signed digital certificate

Step 1 : create a  directory  /websphere/ssl to store all files required for SSL setup.
Step 2 : Start ikeyman utility of IBM HTTP Server from <IHS_ROOT>/bin directory
# ./ikeyman.sh
Step 3 : Click New menu-item under Key Database File menu.
Step 4 : Select CMS as the key database type.
Step 5 : Click OK button.


6. Give a password to secure new key ring when the password prompt appears, say “websphere”

7. Check Stash password to a file option

8. Click OK button.


9. Select Personal Certificates from the drop-down.

10. Click New Self-Signed button.


11. A new window opens up and asks for details for the creation of the digital certificate.

12. Give a meaningful name for key label.

13. Note this down as we need this later.

14. Leave default values for Version, Key Size, Signature Algorithm.

15. Click OK button.

A Self-signed Digital Certificate is generated and is added to the key database.

16. Exit ikeyman tool.


Conclusion : we  have created a database ( kdb file )  and added a Self-Signed Digital Certificate to it.

Part 2: Adding SSL to the IHS virtual host configuration

In this part, we will configure IBM HTTP Server to use the SSL port 443 and point
it to the database holding the Digital Certificate.

Step 1 : Change to <IHS_ROOT>/bin directory and stop IBM HTTP Server, if it is running.

# ./apachectl stop

Step 2 : Add the following text to the bottom of httpd.conf file under <IHS_ROOT>/conf directory, just above the plug-in configuration.


Listen 0.0.0.0:443
<VirtualHost *:443>
SSLEnable
SSLProtocolDisable SSLv2
SSLServerCert ihs_key_label
SSLClientAuth None
</VirtualHost>
SSLDisable
KeyFile "<IHS_ROOT>/bin/key.kdb"
SSLV3Timeout 1000


Please Note : The string mentioned against SSLServerCert is the key label used while generating the
digital certificate. Also replace <IHS_ROOT> with the correct path.


Step 3 : Verify that the SSL modules are uncommented in httpd.conf file, else uncomment the following lines.

LoadModule ibm_ssl_module modules/mod_ibm_ssl.so


Step 4 :. Start IBM HTTP Server from <IHS_ROOT>/bin directory
# ./apachectl start.


Part 3: Propagating keyring file from WAS to Web server.


Next step is to propagate WAS keyring file to IBM HTTP Server, so that the web server can talk to WAS over SSL.

Step 1 : Expand Servers | Expand Server Types | Click Web servers.


Step 2 : Click on <web_server_name> .
Step 3 : Click on Plug-in properties  under Additional Properties section

Step 4 :  Click on Copy to Web server key store directory button.


Step 5 : Check for additional files apart from plugin-cfg.xml under <IHS_ROOT>/Plugins/config/<webserver_name> directory as shown below

/opt/IBM/HTTPServer/Plugins/config/webserver2$ ls -l
total 20
-rw-r--r-- 1 wasadmin wasadmin 3966 2018-04-07 12:11 plugin-cfg.xml
-rw-r--r-- 1 wasadmin wasadmin 10080 2018-04-08 19:12 plugin-key.kdb
-rw-r--r-- 1 wasadmin wasadmin 129 2018-04-08 19:12 plugin-key.sth


Step 6. Restart IBM HTTP server
# ./apachectl stop
# ./apachectl start


Step 7 : Open a browser and type the following URL, with the IP Address of the host running IBM HTTP Server :
https://<IP_ADDRESS>/snoop

Step 8. The following response from the web server indicates correct functioning of the web server and WAS.




Thursday, April 5, 2018

Jboss Patching , Upgrade and Update document

This summary is not available. Please click here to view the post.

Script to expose unix filesystem in web browser - A very Useful Script

Dear Friends


You can use this script to view  unix file system ( for example : JVM Logs ) in web browser, without logging to server.

Let me know, if you feel any issue in executing this script.


[sanpoc@pwebspherebox:/jboss/poc]$ cat SimpleHTTPLog.py
#!/usr/bin/python

import SimpleHTTPServer
import SocketServer
import sys

# minimal web server.  serves files relative to the
# current directory.

#PORT = 44444
PORT = int(sys.argv[1])

Handler = SimpleHTTPServer.SimpleHTTPRequestHandler

Handler.extensions_map.update({
'': 'application/octet-stream', # Default
'.out': 'text/plain',
'.log': 'text/plain'
})
httpd = SocketServer.TCPServer(("", PORT), Handler)

print "serving at port", PORT
httpd.serve_forever()


This script output will be like :
You can expose Websphere installation root directory to webbrowser and can view all files and configurations easily ( Please note, this is not recommended . Use it only during Weekend Oncalls  or when required or  when we want to verify the logs without logging to box or you want to share the log with developer but the log size is too big ).


Script To monitor CPU, Memory and Diskspace during Critical Load Test


Dear Friends


You can use this script to view  CPU usage, Memory Usage , Disk Usage. 
This may be helpful during some performance testing or load testing.

Let me know, if you face any issue in executing this script.


[sanpoc@pwebspherebox:/jboss/poc]$ cat systemperformancecheck.sh


#! /bin/bash
echo "" >> /jboss/scripts/log/system_usage.out
echo `hostname` >> /jboss/scripts/log/system_usage.out
echo "" >> /jboss/scripts/log/system_usage.out
echo `date` >> /jboss/scripts/log/system_usage.out
echo "" >> /jboss/scripts/log/system_usage.out

printf "Date\t\tMemory\t\tDisk\t\tCPU\n" >> /jboss/scripts/log/system_usage.out

end=$((SECONDS+86400))
while [ $SECONDS -lt $end ]; do

MEMORY=$(free -m | awk 'NR==2{printf "%.2f%%\t\t", $3*100/$2 }')
DISK=$(df -h | awk '$NF=="/"{printf "%s\t\t", $5}')
CPU=$(top -bn1 | grep load | awk '{printf "%.2f%%\t\t\n", $(NF-2)}')

DATE=$(date "+%H:%M:          ")

echo "$DATE$MEMORY$DISK$CPU" >> /jboss/scripts/log/system_usage.out
sleep 300
done


This Script will print output like :


LINUX : turn OFF password expiration / aging

Hi Team If you are using linux as OS and want to set password as never expiry for any specific user, please follow the steps mentioned be...